How to Bridge an Objective-C View Component

I am not an Objective-C developer so some of the things I say here may be wrong, so tell me if I'm wrong! React Native is young enough that some cool existing native components need to still be bridged to take advantage of. There is plenty of information out there about bridging modules, and view components.
Here are a fiew
- Leverage Existing iOS Views In Your React Native App
- React Native View Components (1/2)
- React Native View Components (2/2)
- Packaging a React Native component
- Native UI Components - React Native Documentation
Some of these are more up to date and in depth and others lesser so.
What?
What are we bridging?
We are going to do a very basic bridge of FLAnimatedImage. Basically it's a performant component to render animated gifs.
Straight from their README.
FLAnimatedImage is a performant animated GIF engine for iOS:
- Plays multiple GIFs simultaneously with a playback speed comparable to desktop browsers
- Honors variable frame delays
- Behaves gracefully under memory pressure
- Eliminates delays or blocking during the first playback loop
- Interprets the frame delays of fast GIFs the same way modern browsers do
Creating a Component
I tend to like to make my component as an application first and then I'll bust it out into a separate component. I already did that, so we'll just focus on the real process.
To do that we'll create a library.
In XCode go to File > New > Project and select Static Library
Like so
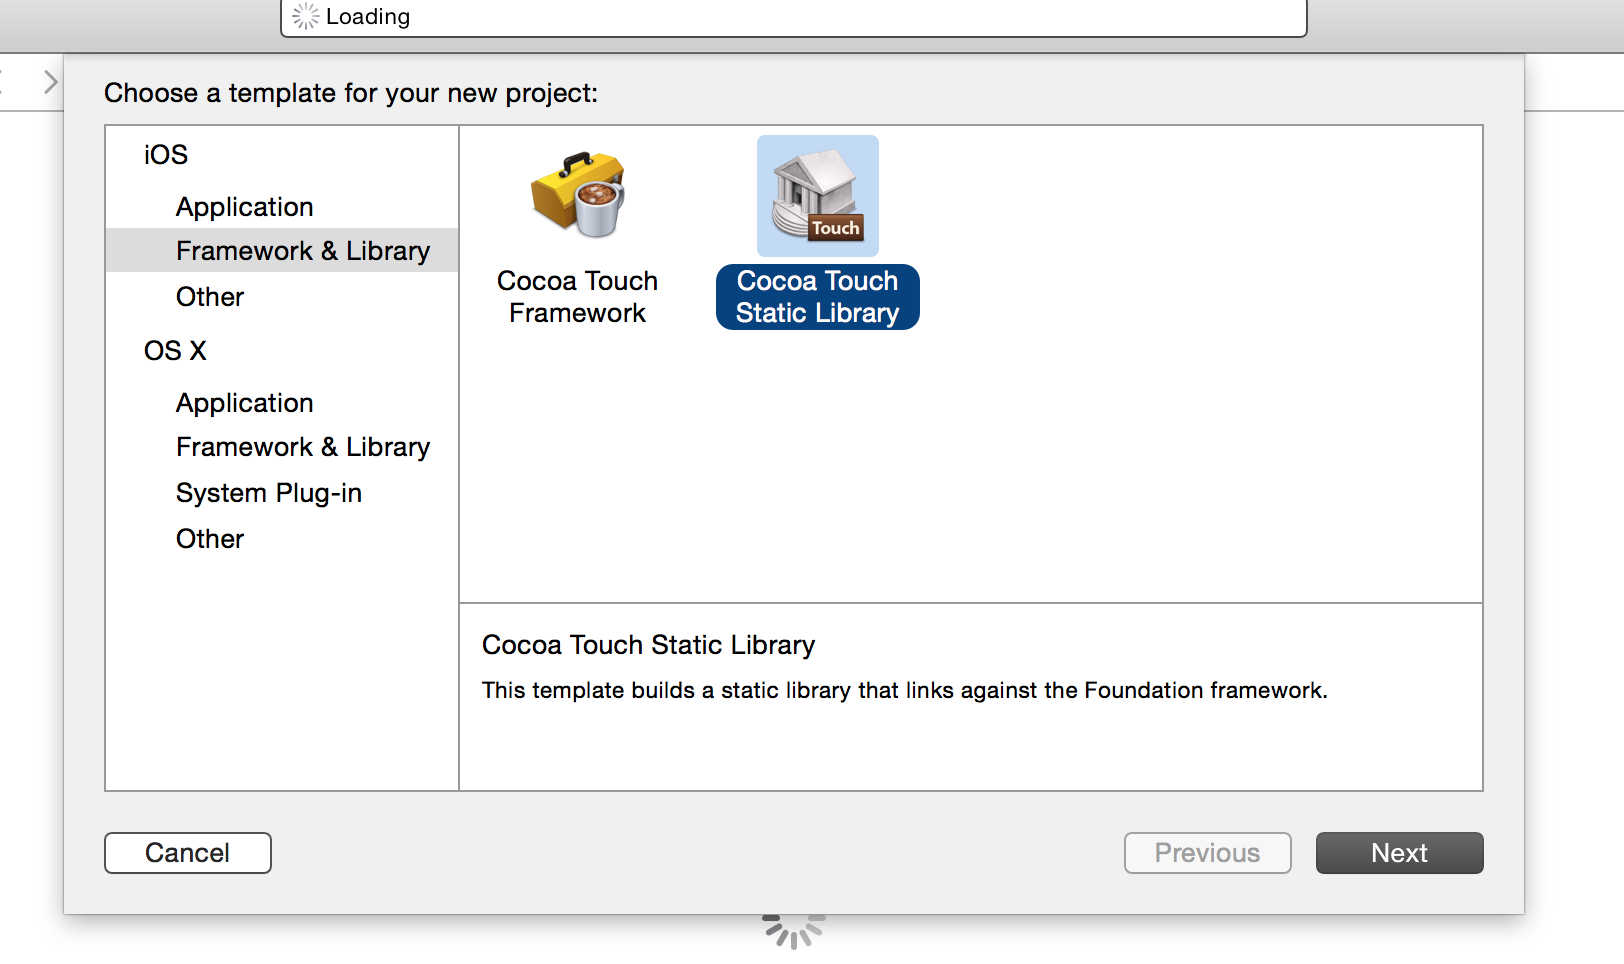
Save that somewhere and call it RNFLAnimatedImage so that you can follow along with the tutorial.
External Dependencies
In our case we are depending on the FLAnimatedImage library. We have a few different choices, using pods?, using Carthage?, or just copy and pasting. For the sake of this we're going to copy and paste. We'll get into this when the tutorial actually starts.
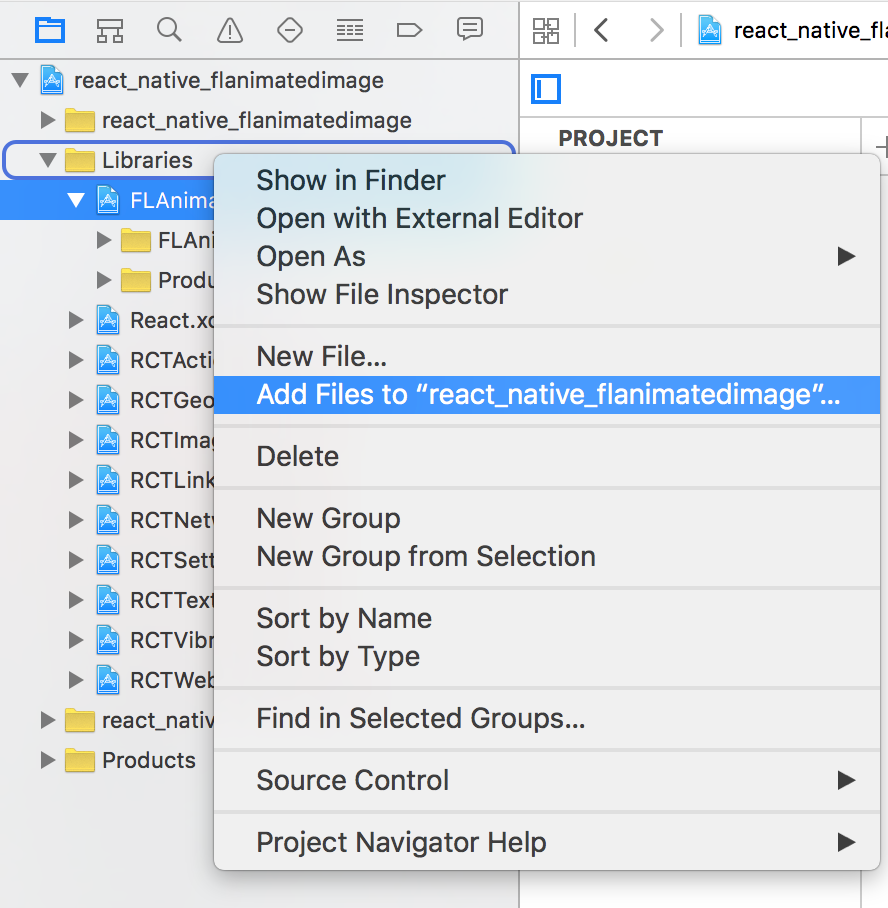
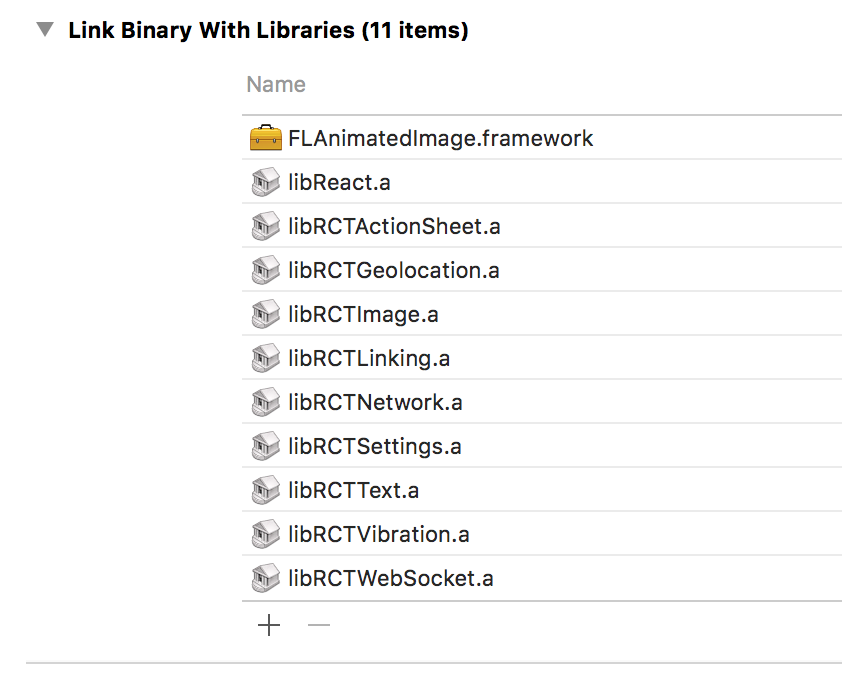
I essentially cloned the repo, and copied over the necessary files. You then go through the usual process of adding a library to an XCode project. You can read about linking libraries here http://facebook.github.io/react-native/docs/linking-libraries-ios.html#content.
Basically do this.
Then do this
Manager vs View
The Manager is the orchestrator of this particular view we are bridging. It's essentially a singleton (there is just one of them) that when asked will produce a new view to use of whatever kind you define. In our case we have an RNFLAnimatedImageManager that when asked will create an RNFLAnimateImage which will create and setup our FLAnimatedImage Objective-C component.
The Manager is also where we setup the module bridge, and declare what sort of properties we need, event callbacks, and additional constants to export if we need any.
The View portion is just that, the View. This is what will be instantiated and hook into some lifecycle events so you can manipulate the Objective-C world.
Each View will need to do different things during these lifecycle events, it's up to you to implement them and figure out what exactly needs to be handled for the component that you are bridging.
Life Cycles/Initializer in the Objective C World
The main life cycle we need to implement is - (void)layoutSubviews.
The other non-lifecycle method that is important is - (instancetype)initWithEventDispatcher:(RCTEventDispatcher *)eventDispatcher.
Additional life cycle calls are - (void)insertReactSubview:(UIView *)view atIndex:(NSInteger)atIndex and - (void)removeReactSubview:(UIView *)subview but we won't talk about those.
The layoutSubviews method gives us an arbitrary hook to control the current view component. You can manipulate the view, add subviews, or add sublayers. In our case we'll add the FLAnimatedImage as a subview.
The initWithEventDispatcher method allows us to handle initialization of the View and additionally save off our eventDispatcher which means we can send messages back to the JavaScript world.
So when you see people sending back callback functions to the native world this is what is sending back the events. So things like onLoad, onVideoProgress, etc you would use this event dispatcher to send out a onLoad or onVideoProgress event name with a payload of data.
Specifying callbacks
In a manager file you would specify something like so
- (NSArray *) customDirectEventTypes {
  return @[
           @"onFrameChange"
          ];
}
In our case we may want to listen for when the GIF frame index changes.
We send stuff from Objective-C world to JavaScript like so
      [_eventDispatcher sendInputEventWithName:@"onFrameChange" body:@{
                                                                       @"currentFrameIndex":[NSNumber numberWithUnsignedInteger:[object currentFrameIndex]],
                                                                       @"frameCount": [NSNumber numberWithUnsignedInteger:[_image frameCount]],
                                                                       @"target": self.reactTag
                                                                       }];
Then in our JavaScript world we can do this.
<FLAnimatedImage
  style={{ flex: 1 }}
  src={this.state.url}
  resizeMode={this.state.resizeMode}
  onFrameChange={(e) =>
    console.log(
      e.nativeEvent.currentFrameIndex + "/" + e.nativeEvent.frameCount
    )
  }
/>
Properties from ObjC to JavaScript
That looks something like
RCTFLAnimatedImageManager.m
RCT_EXPORT_VIEW_PROPERTY(src, NSString);
RCT_EXPORT_VIEW_PROPERTY(contentMode, NSNumber);
RCTFLAnimatedImage.m
@property (nonatomic, assign) NSString *src;
@property (nonatomic, assign) NSNumber *contentMode;
In the JavaScript world when we render our component whatever the src prop is will be put there.
<RNFlAnimatedImage src="http://someanimated.gif" resizeMode={1} />
In the JavaScript world we do need to define our PropTypes on the component.
  propTypes: {
    /*
      native only
    */
    contentMode: PropTypes.number,
    /*

    */
    src: PropTypes.string,
    resizeMode: PropTypes.string,
    onFrameChange: PropTypes.func
  }
Exporting Constants
Sometimes there are strings, numbers, enums, etc in the Objective-C world that you may want to use in the JavaScript world. To do this we use the constantsToExport method in our manager.
- (NSDictionary *) constantsToExport {
  return @{
           @"ScaleAspectFit": @(UIViewContentModeScaleAspectFit),
           @"ScaleAspectFill": @(UIViewContentModeScaleAspectFill),
           @"ScaleToFill": @(UIViewContentModeScaleToFill)
          };
}
We export some NSIntegers (converting them to NSNumbers with the @, thanks Google) and this will get put onto React Native NativeModules.
React.NativeModules.RNFLAnimatedImageManager;
/*
  {
	  ScaleToFill: 0,
	  ScaleAspectFit: 1,
	  ScaleAspectFill: 2
  }
*/
Stop?
Alright that was all a preface to show you the little bits and areas that you can bridge. Maybe you just needed syntax, maybe you wondering about it's capabilities. Either way if you got enough information then no need to go any further. However I encourage you to read on.
Tutorial Start
So we have the empty RNFLAnimatedImage project you created right? Go do it now if you haven't already.
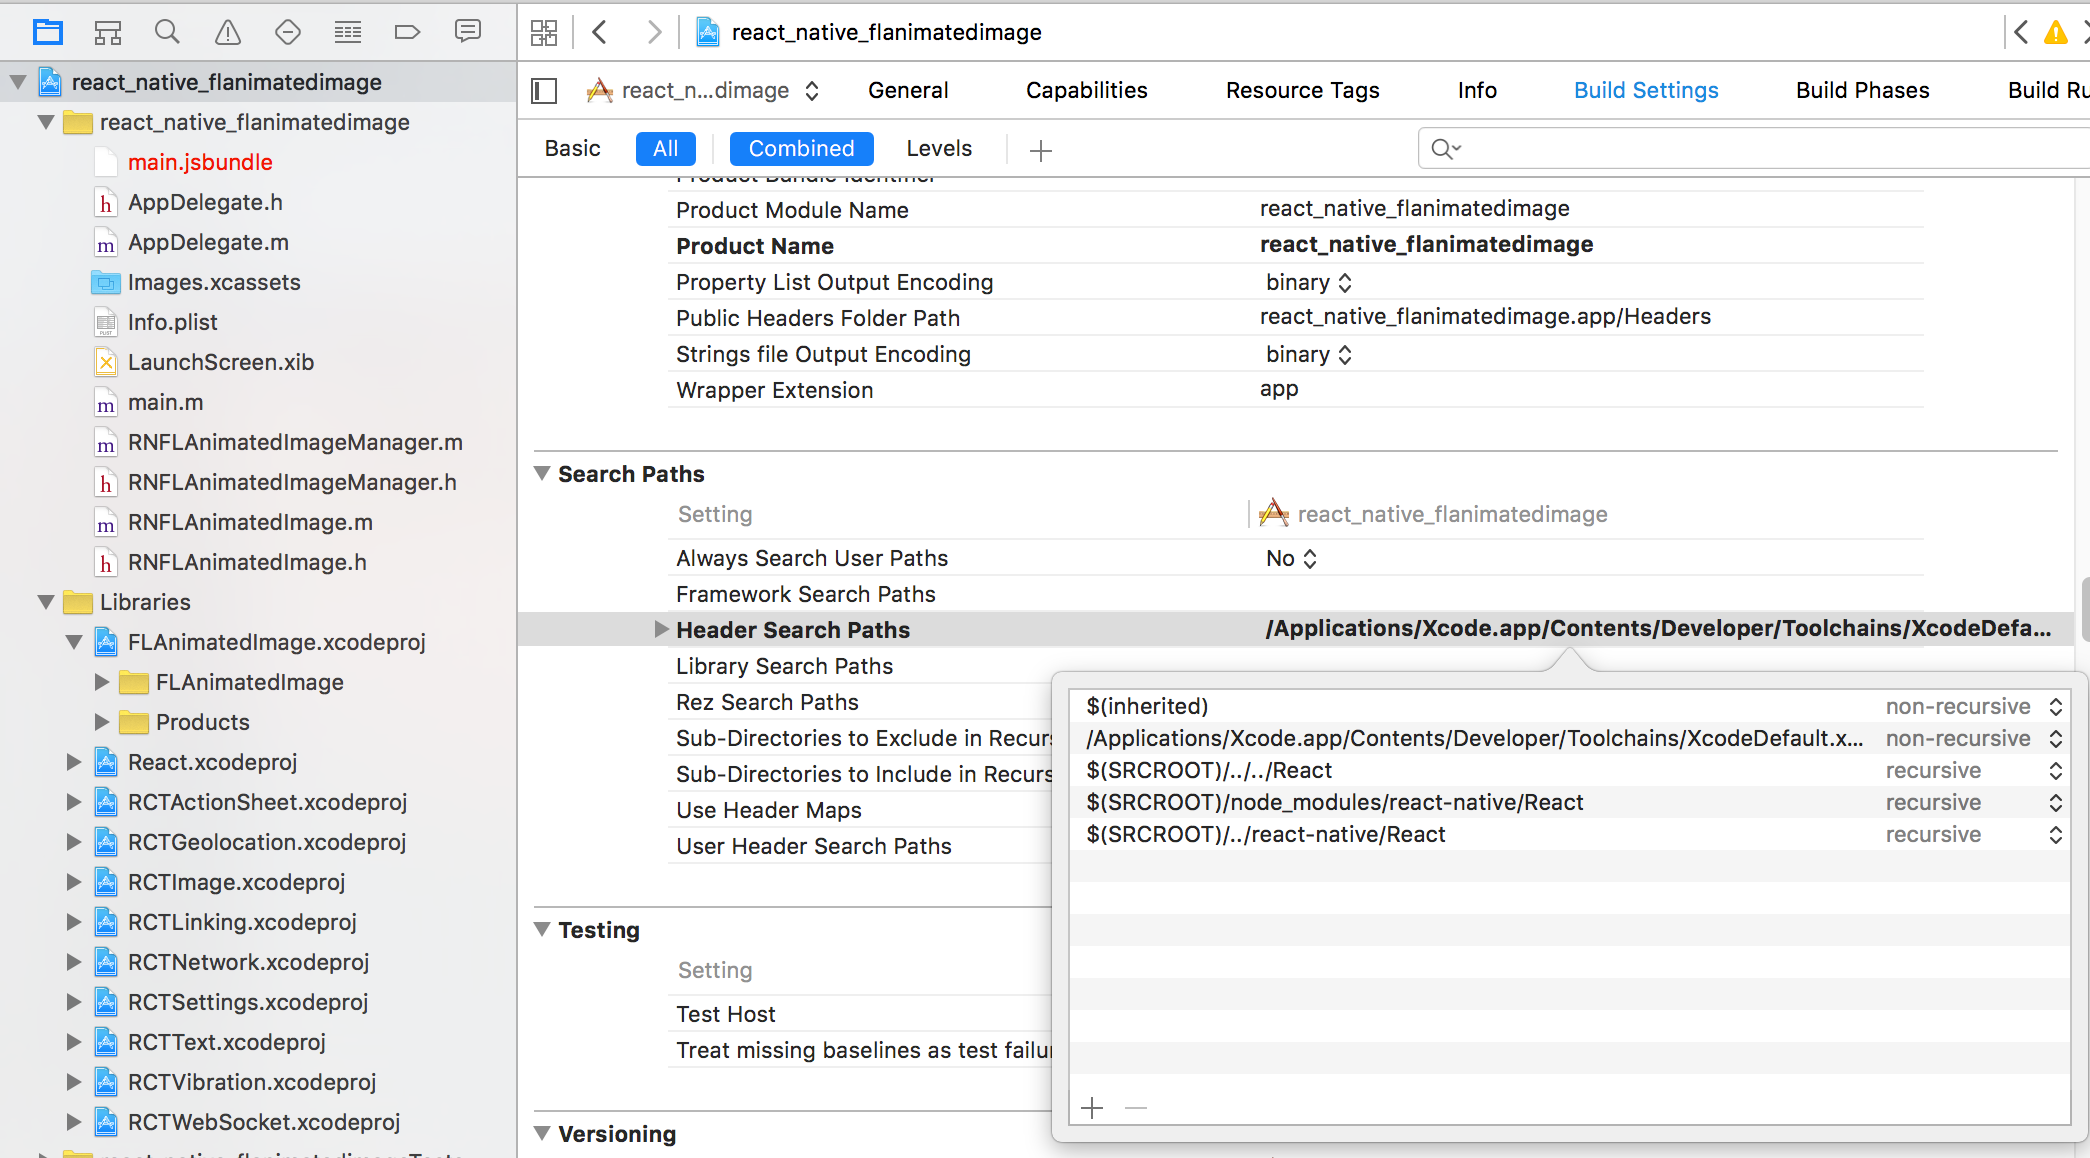
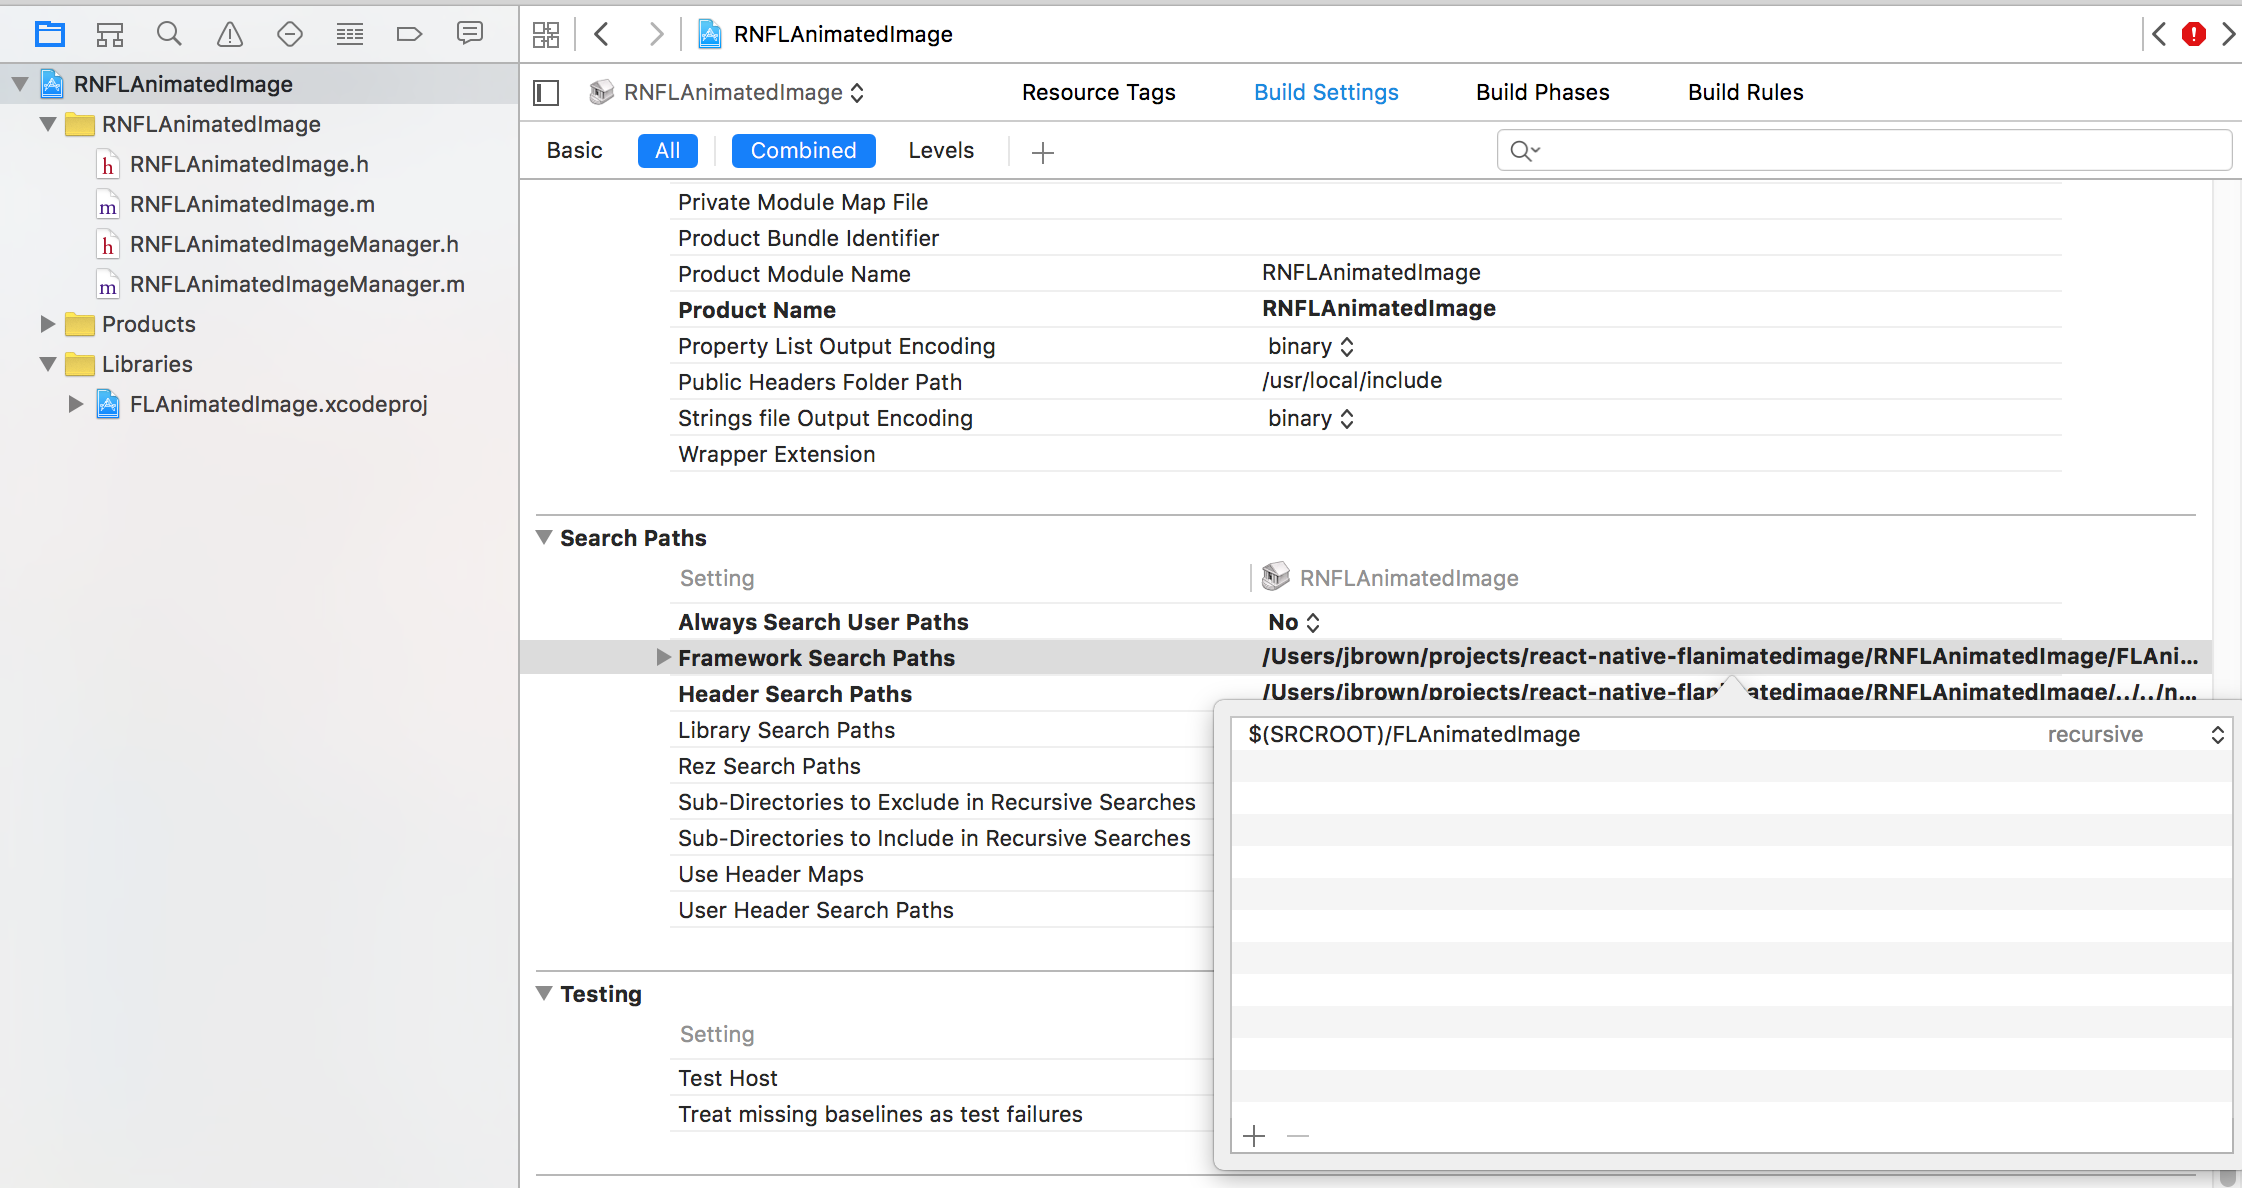
The first thing we are going to need to do is setup our Header Search Paths and add React to it.
We'll need to add various locations to tell Objective-C to look for all the .h and .m files.
add these 5
$(inherited)
/Applications/Xcode.app/Contents/Developer/Toolchains/XcodeDefault.xctoolchain/usr/include
$(SRCROOT)/../../React
$(SRCROOT)/../react-native/React
$(SRCROOT)/node_modules/react-native/React
It should look something like.
FLAnimatedImage ships as a framework, I wasn't able to import the required .h and .m files until I told XCode where to look for FLAnimatedImage.
So lets set that up, add $(SRCROOT)/FLAnimatedImage the Framework Search Paths right above Header Search Paths
Add Manager Files
In creating this RNFLAnimatedImage.m/.h were created but lets create our manager files now.
Just right click on the folder select "New File" and create a .m and name in RNFLAnimatedImageManager.m , same for the .h
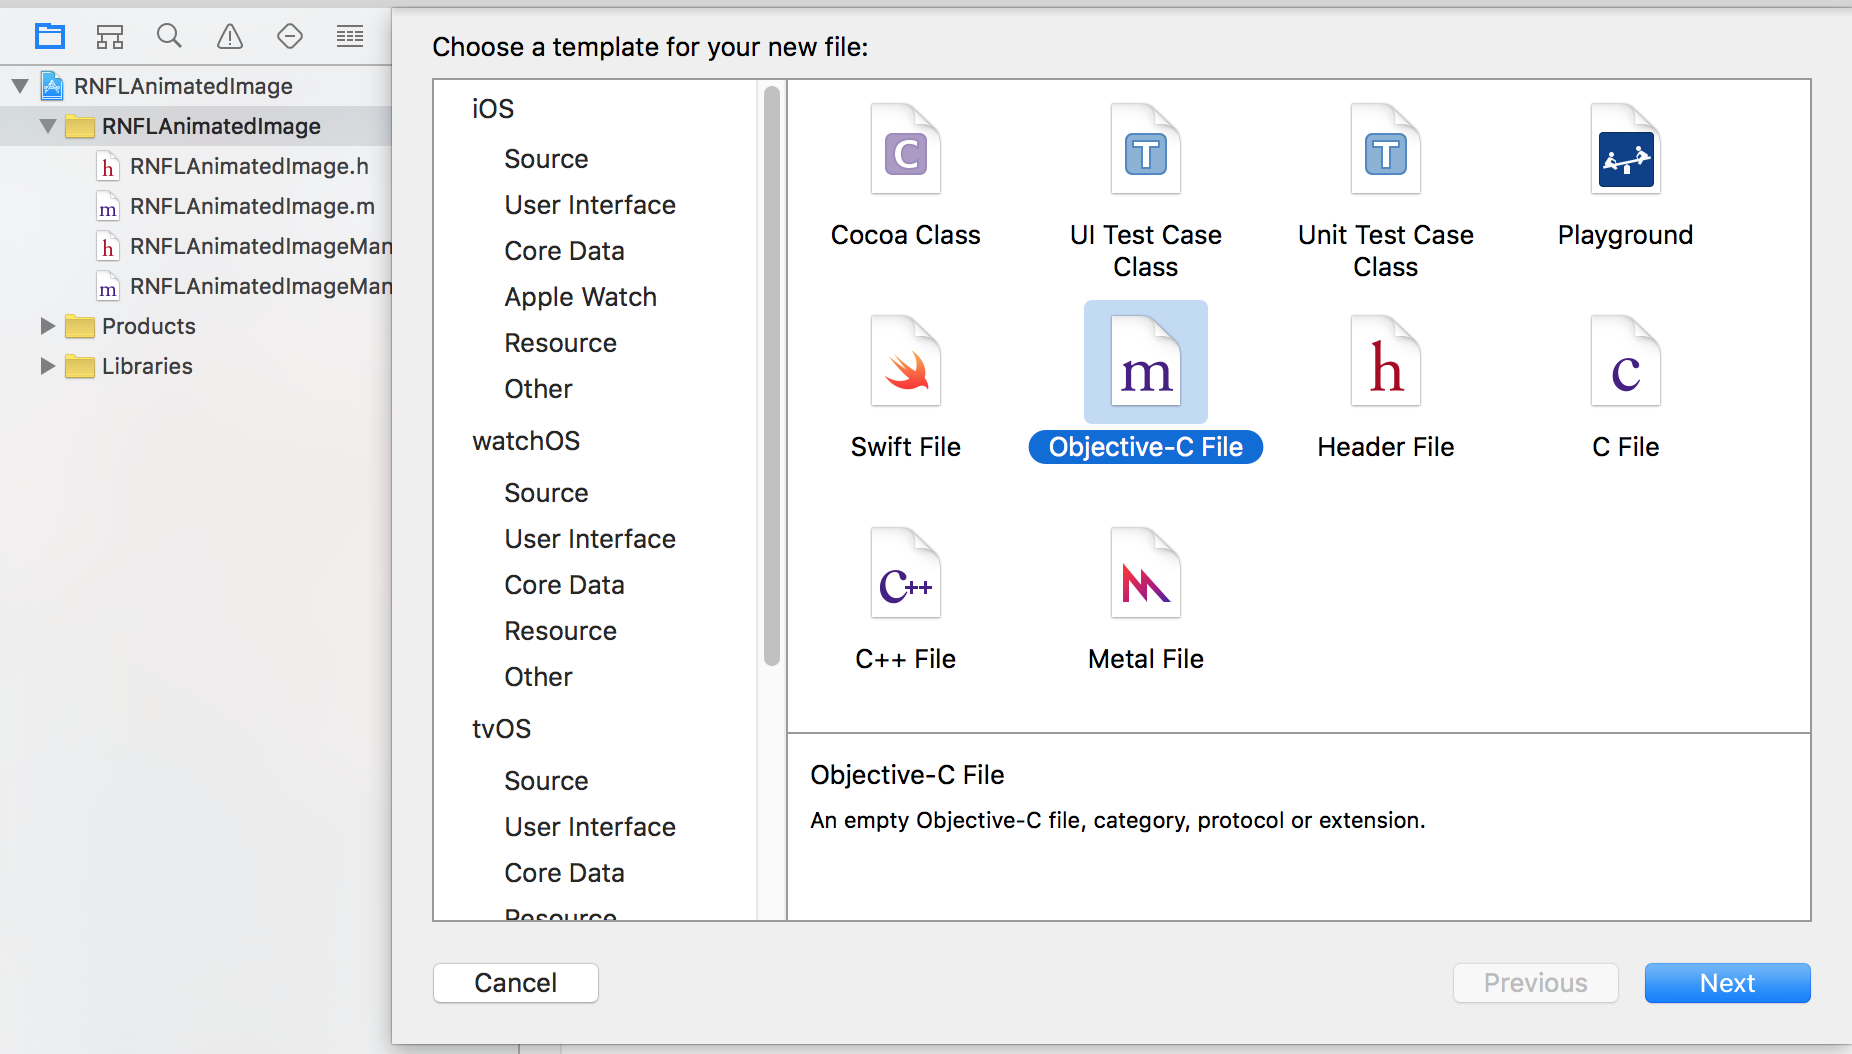
We need to add our new manager files to our compile source.

RNFLAnimatedImageManager.h
#import "RCTViewManager.h"

@interface RNFLAnimatedImageManager : RCTViewManager

@end
That's it, we just have our interface we called RNFLAnimatedImageManager and inherit from RCTViewManager which is provided by React.
RNFLAnimatedImageManager.m
First we need to import some stuff
#import <Foundation/Foundation.h>
#import "RCTBridge.h"
#import "RNFLAnimatedImageManager.h"
#import "RNFLAnimatedImage.h"
We bring in the bridging mechanism from React, the Manager.h file, and additionally the .h for the view we're bridging.
@implementation RNFLAnimatedImageManager

RCT_EXPORT_MODULE();

@synthesize bridge = _bridge;
Inside our implementation we call RCT_EXPORT_MODULE() that tells React we are exporting a module.
The @synthesize bridge stuff is declaring that we want to just auto generate some getters and setters for our bridge.
- (UIView *)view
{
  return [[RNFLAnimatedImage alloc] initWithEventDispatcher:self.bridge.eventDispatcher];
}
This is called to create a new view. We are allocating our view RNFLAnimatedImage and initializing it with the eventDispatcher so we can communicate back to the JavaScript world.
- (dispatch_queue_t)methodQueue
{
  return dispatch_get_main_queue();
}
This has something to do with dispatching :). I think it says that when we dispatch it should go on the main queue?
RCT_EXPORT_VIEW_PROPERTY(src, NSString);
RCT_EXPORT_VIEW_PROPERTY(contentMode, NSNumber);
Define some properties to bridge.
- (NSArray *) customDirectEventTypes {
  return @[
           @"onFrameChange"
          ];
}
Define some function callback/events we can dispatch.
- (NSDictionary *) constantsToExport {
  return @{
           @"ScaleAspectFit": @(UIViewContentModeScaleAspectFit),
           @"ScaleAspectFill": @(UIViewContentModeScaleAspectFill),
           @"ScaleToFill": @(UIViewContentModeScaleToFill)
          };
}

@end
Finally we define some constants to export and end our implementation.
Link to the file on github https://github.com/browniefed/react-native-flanimatedimage/blob/master/RNFLAnimatedImage/RNFLAnimatedImage/RNFLAnimatedImageManager.m.
RNFLAnimatedImage.h
#import "RCTEventDispatcher.h"
#import "FLAnimatedImage/FLAnimatedImage.h"

@class RCTEventDispatcher;


@interface RNFLAnimatedImage : UIView

@property (nonatomic, assign) NSString *src;
@property (nonatomic, assign) NSNumber *contentMode;

- (instancetype)initWithEventDispatcher:(RCTEventDispatcher *)eventDispatcher NS_DESIGNATED_INITIALIZER;

@end
We import our event dispatcher, and tell the compiler that the class RCTEventDispatcher will be defined.
We create our interface, give it the name RNFLAniamtedImage and inherit from the base UIView.
We add our properties, don't worry about the nonatomic stuff, if you want to know go le google it.
Finally we define our initWithEventDispatcher method that our Manager initialized with. The NS_DESIGNATED_INITIALIZER is to tell the compiler that this is our initializer vs the typical init.
RNFlAnimatedImage.m
Alright this will be where all of our bridging work comes into play. Read through the full source here https://github.com/browniefed/react-native-flanimatedimage/blob/master/RNFLAnimatedImage/RNFLAnimatedImage/RNFLAnimatedImage.m.
So first we need to import stuff and define our basic implementation
#import <Foundation/Foundation.h>
#import "FLAnimatedImage/FLAnimatedImage.h"

#import "RCTBridgeModule.h"
#import "RCTEventDispatcher.h"
#import "UIView+React.h"

#import "RNFLAnimatedImage.h"

@implementation RNFLAnimatedImage : UIView  {

}

@end
Don't worry too much about what's getting imported. Most of them are just so React can do it's thing.
@implementation RNFLAnimatedImage : UIView  {

  RCTEventDispatcher *_eventDispatcher;
  FLAnimatedImage *_image;
  FLAnimatedImageView *_imageView;

}
We now define our instance variables that we'll assign inside of this implementation. We setup our eventDispatcher, the image and imageView with their specific types.
- (instancetype)initWithEventDispatcher:(RCTEventDispatcher *)eventDispatcher
{
  if ((self = [super init])) {
    _eventDispatcher = eventDispatcher;
    _imageView = [[FLAnimatedImageView alloc] init];

    [_imageView addObserver:self forKeyPath:@"currentFrameIndex" options:0 context:nil];
  }

    return self;
}
This is our initializer that we had defined. It receives eventDispatcher as the only argument. We then save it off to the eventDispatcher variable we create up above. Then create a new FLAnimatedImageView and save that off. The addObserver we'll get into later, but this is going to allow us to asynchronously hook into the currentFrameIndex of our animated gif and call the callback.
#pragma mark - React View Management

- (void)insertReactSubview:(UIView *)view atIndex:(NSInteger)atIndex
{
    RCTLogError(@"image cannot have any subviews");
    return;
}

- (void)removeReactSubview:(UIView *)subview
{
    RCTLogError(@"image cannot have any subviews");
    return;
}


- (void)layoutSubviews
{
  [super layoutSubviews];
  _imageView.frame = self.bounds;
  [self addSubview:_imageView];
}
These are the important React added lifecylce methods. The insertReactSubview and removeReactSubview is how we would go about allowing children.
The layoutSubviews is the call that gives us the ability to add in our FLAnimatedImageView that we created into the RNFLAnimatedImage that we are creating. This method is going to be the one that is going to be mostly a custom implementation depending on what components you end up bridging.
The other import thing to call out is self.bounds this is a CGRect that contains x,y and width/height that is going to be provided from the style that is defined in the JavaScript world!
- (void)setSrc:(NSString *)src
{
  if (![src isEqual:_src]) {
    _src = [src copy];
    [self reloadImage];
  }
}

- (void)setContentMode:(NSNumber *)contentMode
{
  if(![contentMode isEqual:_contentMode]) {
    _contentMode = [contentMode copy];
    [self reloadImage];
  }
}
These are setters that we hook into so that when a setState happens and a re-render is triggered in the JavaScript world these get called. We check if our src is different and or if our contentMode is different, if it is we set our instance variables to the new values and call reloadImage.
-(void)reloadImage {
  _image = [FLAnimatedImage animatedImageWithGIFData:[NSData dataWithContentsOfURL:[NSURL URLWithString:_src]]];
  _imageView.contentMode = [_contentMode integerValue];
  _imageView.animatedImage = _image;
}
Our reload image is more of a setup/modify image. We set our image to be the FLAnimatedImage with the gif data from a URL. We pass our src in there which comes from the bridged value from the JavaScript world.
We setup our contentMode on the imageView then set our imageView.animatedImage to be the image of the url.
-(void)observeValueForKeyPath:(NSString *)keyPath ofObject:(id)object change:(NSDictionary<NSString *,id> *)change context:(void *)context {
  if (object == _imageView) {
    if ([keyPath isEqualToString:@"currentFrameIndex"]) {
      [_eventDispatcher sendInputEventWithName:@"onFrameChange" body:@{
                                                                       @"currentFrameIndex":[NSNumber numberWithUnsignedInteger:[object currentFrameIndex]],
                                                                       @"frameCount": [NSNumber numberWithUnsignedInteger:[_image frameCount]],
                                                                       @"target": self.reactTag
                                                                       }];
    }
  }
}
When observers get setup (like we did in the initializer) the observerveValueForKeyPath method will be called with the information about the thing that changed.
In our case object was setup to be our imageView and the keyPath was currentFrameIndex.
We do some checking to make sure that the object is in fact our imageView, and that the keyPath we are dealing with is the currentFrameIndex. If it is this when we send our event to be dispatched. It just so happens to be named onFrameChange and our body can be custom crafted and will be ultimately translated into JSON for us. We pass back the currentFrameIndex and the total frameCount as well as the React Component we are dealing with.
- (void)removeFromSuperview
{

    [_imageView removeObserver:self forKeyPath:@"currentFrameIndex"];
    _eventDispatcher = nil;
    _image = nil;
    _imageView = nil;
    [super removeFromSuperview];
}
Finally the removeFromSuperview function is called. This is the equivalence of componentWillUnmount in the React JavaScript world. Here we clean up the observer, as well as the other things we have created.
You are now done with Objective-C! Check out the full source code here https://github.com/browniefed/react-native-flanimatedimage/blob/master/RNFLAnimatedImage/RNFLAnimatedImage/RNFLAnimatedImage.m.
FLAnimatedImage.js
Now we are back in our JavaScript world. We've done the hard part.
var React = require("react-native");
var { requireNativeComponent, PropTypes, NativeModules } = React;

var { ScaleToFill, ScaleAspectFit, ScaleAspectFill } =
  NativeModules.RNFLAnimatedImageManager;

var MODES = {
  stretch: ScaleToFill,
  contain: ScaleAspectFit,
  cover: ScaleAspectFill,
};

var FLAnimatedImage = React.createClass({
  propTypes: {
    /*
      native only
    */
    contentMode: PropTypes.number,
    /*

    */
    src: PropTypes.string,
    resizeMode: PropTypes.string,
    onFrameChange: PropTypes.func,
  },
  render() {
    var contentMode = MODES[this.props.resizeMode] || MODES.stretch;
    return <RNFLAnimatedImage {...this.props} contentMode={contentMode} />;
  },
});

var RNFLAnimatedImage = requireNativeComponent(
  "RNFLAnimatedImage",
  FLAnimatedImage
);

module.exports = FLAnimatedImage;
The important parts to call out is that all values being passed to the component/native world need to have a PropType specified! If you noticed something a bit weird. We create a class called FLAnimatedImage which we call to requireNativeComponent that creates RNFLAnimatedImage which then FLAnimatedImage renders. Weird cyclic thing, but ultimately it allows us to tell React what component our class is going to need to be rendered.
The MODES thing is just so we can map a nice string the user can give us to one of the constants that we exported from our Objective-C world.
DONE!
Hey look you did it. We got through the weird brackted world of Objective-C. To use it we require it and pass in our props.
<FLAnimatedImage
  style={{ flex: 1 }}
  src="http://raphaelschaad.com/static/nyan.gif"
  resizeMode="contain"
  onFrameChange={(e) =>
    console.log(
      e.nativeEvent.currentFrameIndex + "/" + e.nativeEvent.frameCount
    )
  }
/>
Final Code
The code is all up on github, check the repo out here https://github.com/browniefed/react-native-flanimatedimage and the folder where the Objective-C code is at is right here https://github.com/browniefed/react-native-flanimatedimage/tree/master/RNFLAnimatedImage/RNFLAnimatedImage.
Now we have a bridge AnimatedGif component at our exposure.