Setup Hasura with Remote Schema Joins to Return Signed S3 Urls

Introduction
It is important to keep images, and files secure within your S3 buckets. However then accessing those images can be tricky as you then have to fetch and generate signed URLs. Signed URLs are ways to give access to images/files with in a secure s3 bucket for a set period of time. Hasura combined with remote joins makes it extremely easy to stitch generating these links into your GraphQL schema. Further more you can ensure that the user accessing it has the correct permissions and then deny those requests.
We're going to walk through setting up a small GraphQL schema, that will receive an s3 file path and then generate an s3 signed url. Then we'll add it as a remote schema into Hasura, and show how to set up a remote join so that the signed url can be seamlessly stitched into your fetching of data from your Hasura setup.
Setup API to Work With Vercel
It doesn't matter necessarily how or where your backend code is running but we'll set it up for ease of running using vercel and vercel dev command. To set that up we first need to setup a few configuration bits.
In a vercel.json file setup a path to our API code.
{
  "functions": {
    "api/*.ts": {
      "memory": 1024,
      "maxDuration": 10
    }
  }
}
The default vercel setup is to parse the incoming body. However the apollo-server-micro implementation we will use will handle all of the body parsing for us. So we need to disable that.
In our api/file.ts that we will be creating, we need to add a config export to turn this bodyParser off.
export const config = {
  api: {
    bodyParser: false,
  },
};
One other thing we need to add an environment variable to our docker-compose for hasura so that we have a dynamic variable for where our GraphQL endpoint will be running at.
FILE_SCHEMA: http://host.docker.internal:3000/api/file
The host.docker.internal is a docker path that allows things running inside of docker the ability to request things running on your localhost not inside of the docker container. So that is why we need to use it because our API will not be running inside of our docker container.
Add a Graphql Resolver
Now lets setup a GraphQL server. We will use Apollo but we will use the micro flavor of it using apollo-server-micro. This lets us also use a few other micro flavored libraries built by the team at Vercel.
We will break this into a few parts. The first is defining our type definitions. This is the schema for how our GraphQL server will operate.
const typeDefs = gql`
  type FilePayload {
    filePath: String!
    url: String!
  }

  type Query {
    get_file(filePath: String): FilePayload
  }
`;
We setup a get_file query function that will receive the filePath as a string from Hasura.
const resolvers = {
  Query: {
    get_file: async (parent, data: { filePath: string }, context) => {
      // Load File
    },
  },
};
Then we actually create our resolvers, this will be filled in later with actual code. This will just setup a get_file function that matches the type definitions we had above.
const apolloServer = new ApolloServer({ typeDefs, resolvers });
export default apolloServer.start().then(() => {
  return apolloServer.createHandler({
    path: "/api/file",
  });
});
Then we setup our server with the type definitions and resolvers. Then start up the server. One piece that needs to change is providing the apollo handler what the actual path the system is running at. We are using a file based routing system so because it is in api/file.ts the request path is /api/file.
import { ApolloServer, gql } from "apollo-server-micro";

const typeDefs = gql`
  type FilePayload {
    filePath: String!
    url: String!
  }

  type Query {
    get_file(filePath: String): FilePayload
  }
`;

const resolvers = {
  Query: {
    get_file: async (parent, data: { filePath: string }, context) => {
      // Load File
    },
  },
};

const apolloServer = new ApolloServer({ typeDefs, resolvers });
export default apolloServer.start().then(() => {
  return apolloServer.createHandler({
    path: "/api/file",
  });
});

export const config = {
  api: {
    bodyParser: false,
  },
};
All together we now have a serverless GraphQL system running. We have a single query, however you could add more queries, mutations, etc. Whatever you needed to do.
Add Loading S3 Image
Now we need to take the filePath that will come from Hasura and actually go grab a signed URL. First we will need the aws-sdk.
import { Credentials } from "aws-sdk";
import S3 from "aws-sdk/clients/s3";
You will need a few secrets from your AWS console. Those include an access key, secret key, and eventually a bucket where all your content is stored. You will just need to make sure that the access key/secret key pair have correct IAM permissions for getting S3 files for the bucket you specify.
To set up these secrets just rename the .env.sample to .env and add in the values. Once you restart the vercel dev server running you will have the values loaded in automatically.
export const getS3Access = () => {
  const access = new Credentials({
    accessKeyId: process.env.AWS_ACCESS_KEY_ID,
    secretAccessKey: process.env.AWS_SECRET_ACCESS_KEY,
  });

  const s3 = new S3({
    credentials: access,
    region: "us-west-2",
    signatureVersion: "v4",
  });

  return s3;
};
The getS3Access code creates a credential pair, then sets up an S3 access instance to load files from the us-west-2 region. If your S3 bucket is not in that region you will need to change this.
Now we write up a get_s3_image function. It takes a filePath, then gets our s3 instance with access. We need to specify how long this signed url should live. Basically how long should new requests to it return the image/file before it is no longer allowed.
Here we specify 2 hour time limit.
We use the getSignedUrlPromise call for the getObject request which will only allow people to get the object, but not create anything else. We then specify the bucket from a secret, the Key is the file/folder path with in the bucket, then pass in our time.
This will return a URL that we can now send back to our users.
const get_s3_image = async ({ filePath }: { filePath: string }) => {
  const s3 = getS3Access();

  const signedUrlExpireSeconds = 60 * 60 * 2; // 2 hours

  const url = await s3.getSignedUrlPromise("getObject", {
    Bucket: process.env.AWS_S3_STORAGE_BUCKET,
    Key: filePath,
    Expires: signedUrlExpireSeconds,
  });

  return {
    url: url,
  };
};
The only thing left is to wire it up to our GraphQL resolver. We receive a filePath from our future Hasura request. So now we just send that into our get_s3_image and then we can return that url to our get_file query resolver. We just need to make sure we match up the return values to what our type definition is. So in our case we are returning a url and the filePath.
const resolvers = {
  Query: {
    get_file: async (parent, data: { filePath: string }, context) => {
      const { url } = await get_s3_image({ filePath: data.filePath });
      return {
        filePath: data.filePath,
        url: url,
      };
    },
  },
};
Add Hasura Remote Schema
Hasura remote schema feature needs to introspect the GraphQL schema. So it will make a request to our server and grab those type definitions that we setup. So we need to make sure that the server is running otherwise it won't work.
To add this remote schema cd into the hasura folder and run hasura console.
Click on Remote Schemas up to and click Add. We'll give it a name, this can be anything you want. Then also we will use that FILE_SCHEMA we passed into Hasura via our docker-compose.yaml file and specify that as our GraphQL server URL.
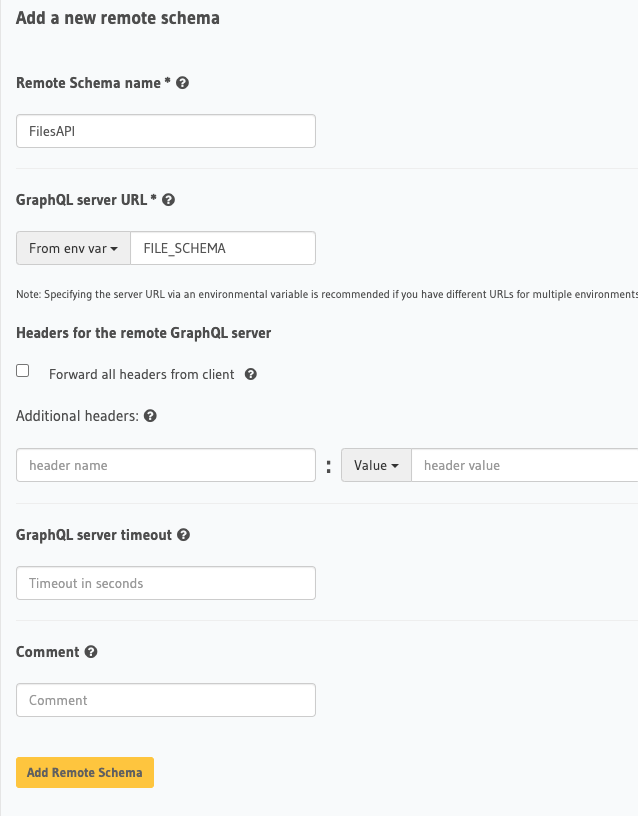
Once we click save, we'll see a request go out to our running server and introspect it. You should also now see a get_file at the top level of your Hasura explorer.
Create a Remote Join
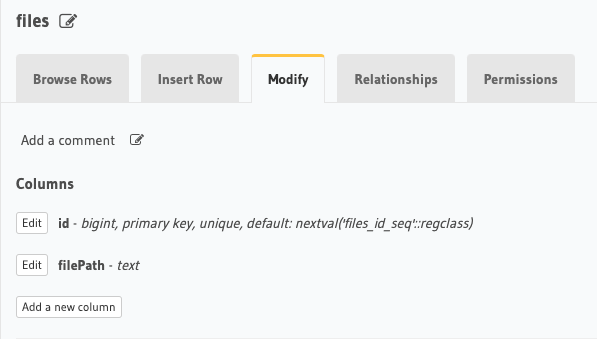
Now that it is added we need to tell Hasura to create a remote join relationship. So first go over to our files table. This is just a table with an id and a filePath.
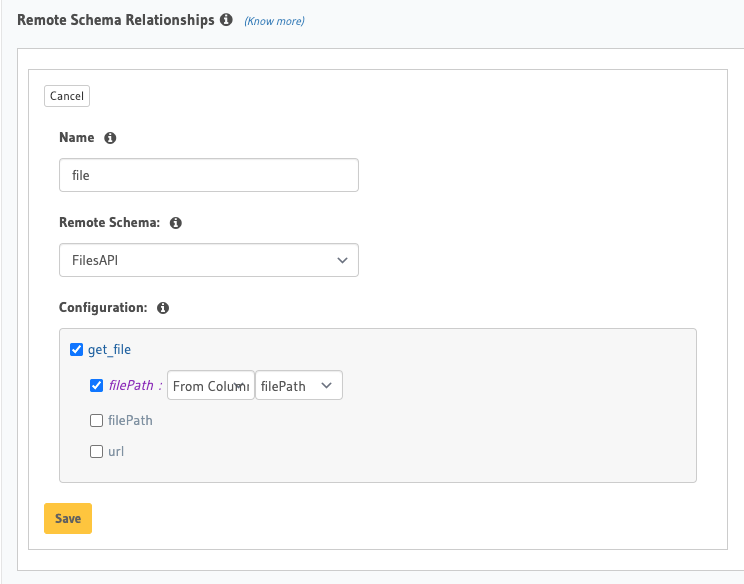
Click on the Relationships tab and scroll to the bottom where it says Remote Schema Relationships. The name you type in as the relationship name will be what appears as the name for when you request it from files. So give this a name you are comfortable using in your query.
Then we select our remote schema we added called FilesAPI and it'll pop up the query arguments. Our only query argument is filePath and we will use the column value filePath as the value that will be sent to our GraphQL server.
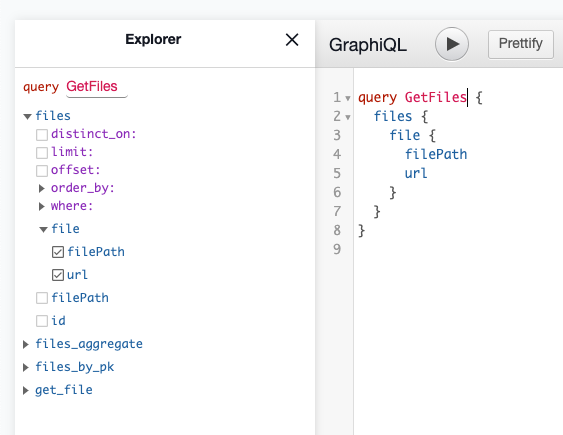
Once we add that, we can go re-visit our explorer and see that we now have our files table with the ability to request a nested singed file url from our server.
query GetFiles {
  files {
    file {
      filePath
      url
    }
  }
}
Ending
Now with that added, you can now make requests with your query and Hasura will hit the remote schema on your behalf, with the rows filePath and stitch it right into the result.
This is approach works, however if you need to add security around it you can do all of the checks you need about the user accessing the content inside of your get_file query resolver.